Overview
For my personal life I am using a combination of a Windows PC, which dual-boots into Debian, which normally works really well. However, every now and then, I don’t feel like booting into Linux, or trying to do something remotely from my laptop - for that I always wanted to created a virtualised development environment (I am running a custom built home server with Proxmox for most of my pet projects).
Again, most people would say - not really a problem, just SSH into your VM and do whatever you want (or use VSCode remoting functionality). But what if I want to use GUI? One obvious reason for that is running IntelliJ GoLand which is still vastly superior to anything VSCode can offer.
To make things more complicated, I’m a big sucker for a good looking UX, and I positively despise how modern Linux shells look without hardware acceleration. Solution? A Proxmox-controlled VM with enabled hardware graphic acceleration. Now, that’s a loaded topic, which might take a while - so stay with me.
Getting ready
In this blog post, I’ll be assuming you are familiar with Linux command line and in general are comfortable with Proxmox, so I will mostly skim through these parts.
I am also assuming that you have Proxmox installed and configured. If you don’t, Proxmox installation guide is a great place to start.
Finally, make sure that you get yourself a Dummy HDMI adapter - it plugs into your HDMI port and pretends to be any type of display you want it to be (in the UK it only costs £5 on Amazon) – or plug in real display. Without anything in HDMI port passthrough works, but graphic acceleration doesn’t.
Configuring PCI pass-through
There are numerous articles on PCI passtrhough in Proxmox, personally I find this Reddit post to be most conclusive, with abundance of the information one might need to get it configured, both for Intel and AMD CPUs (I’ll be using Intel CPU and Intel integrated video card in this blog post). At the highest level, you will need:
-
Enable IOMMU in the BIOS. IOMMU is Input-output memory management unit (basically, it allows CPU to access the memory of direct-memory-access capable devices in the same way as it does access regular physical memory, read this wiki article for more details).
-
Enable IOMMU support for Linux Kernel. It basically amounts to editing
/etc/default/grubon your Proxmox machine and adding eitherintel_iommu=onoramd_iommu=on; which one to use when we leave as an excercise for a keen reader. After that, you update GRUB by runningsudo update-grub. -
Allow the following VFIO modules in Proxmox by adding them to
/etc/modules(VFIO is an IOMMU/device framework which allows userspace apps to access IOMMU in secure way, read more here).
vfio
vfio_iommu_type1
vfio_pci
vfio_virqfd
-
Reddit post I mentioned above recommends to configure IOMMU interrupt mapping after that, but personally I found that this step is redundant and things work as they are. Likewise, I didn’t find that blocklisting drivers is necessary, but maybe this is because I’m using built-in video and YMMV with discrete graphics card.
-
Finish configuration by issusing
sudo update-initramfs -u -k alland rebooting your Proxmox server.
So far, we’ve been preparing the system to allow the passthrough, now the real
fun begins - the actual pass-through. First we need to figure what is the device
we’d like to pass-through - start with lspci command.
[sgzmd@monster:~]$ lspci
00:00.0 Host bridge: Intel Corporation Comet Lake-S 6c Host Bridge/DRAM Controller (rev 03)
00:02.0 VGA compatible controller: Intel Corporation CometLake-S GT2 [UHD Graphics 630] (rev 03)
00:14.0 USB controller: Intel Corporation Comet Lake PCH-V USB Controller
00:14.2 Signal processing controller: Intel Corporation Comet Lake PCH-V Thermal Subsystem
00:16.0 Communication controller: Intel Corporation Device a3ba
00:17.0 SATA controller: Intel Corporation 400 Series Chipset Family SATA AHCI Controller
00:1b.0 PCI bridge: Intel Corporation Device a3eb (rev f0)
00:1c.0 PCI bridge: Intel Corporation Device a393 (rev f0)
00:1c.4 PCI bridge: Intel Corporation Device a394 (rev f0)
00:1d.0 PCI bridge: Intel Corporation Device a398 (rev f0)
00:1f.0 ISA bridge: Intel Corporation Device a3c8
00:1f.2 Memory controller: Intel Corporation Memory controller
00:1f.3 Audio device: Intel Corporation Device a3f0
00:1f.4 SMBus: Intel Corporation Comet Lake PCH-V SMBus Host Controller
01:00.0 Non-Volatile memory controller: Sandisk Corp WD Blue SN550 NVMe SSD (rev 01)
02:00.0 Ethernet controller: Realtek Semiconductor Co., Ltd. RTL8111/8168/8411 PCI Express Gigabit Ethernet Controller (rev 16)
03:00.0 Serial Attached SCSI controller: Broadcom / LSI SAS2008 PCI-Express Fusion-MPT SAS-2 [Falcon] (rev 03)
Now there’s a ton of output, but only the second line is really interesting:
00:02.0 VGA compatible controller: Intel Corporation CometLake-S GT2 [UHD Graphics 630] (rev 03)
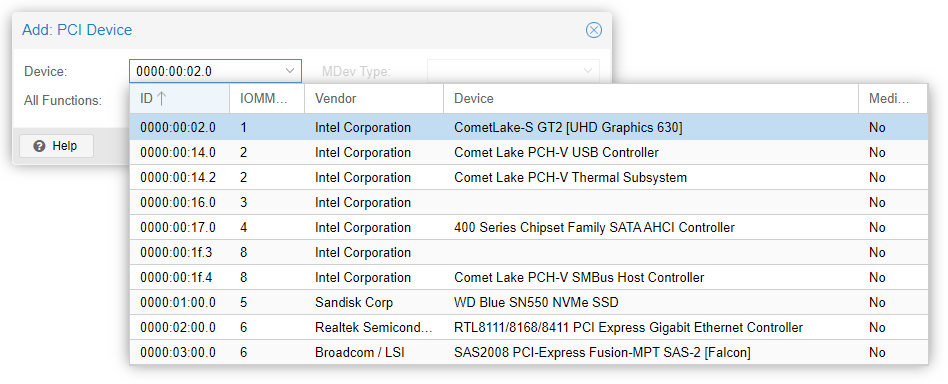
This is out videocard, and it’s the one we’ll be passing through to your VM. In your VM settings in Proxmox navigate to Hardware tab and click Add device. In the drop down, select “PCI device”, and in the window that will open choose your PCI device:
Boot into your VM and verify with lspci that your graphics card is now
available in the host system. In addition, check with hwinfo --display that
the graphics card is available to the system.
In the next post I’ll describe what does it take to configure graphic acceleration and Chrome Remote Desktop to access your virtual workstation and enjoy all graphical goodness of it.