Obsidian with LiveSync: your very own CouchDB-backed cloud notes
I’ve been using Obsidian for some time now; if this is the first time you hear about - think of Notion, but the one which is local to you - where you control where the files are stored, and what information - if any - is shared with other companies. In the most basic sense, Obsidian is just a nice wrapper around a bunch of Markdown files, stored on your local disk.
Introduction and overview
One obvious downside is that the files are local - so if you want to use it on more than one computer (or, perhaps, your mobile!) things aren’t gonna look so pretty. There are a bunch of ways to solve it - to name a few:
- Official Obsidian sync - it costs only $4, and basically solve this problem for you. Except now you no longer control where you data is stored and what is happening with it. Sometimes it’s OK - if you are only storing you fried chicken recipes, who would care? - but sometimes it’s just not OK (btw if you don’t use their subscription, I strongly encourage you to support project monetarily in other ways - e.g. Obsidian Catalyst).
- Just dumping your entire Obsidian folder to Google Drive / Dropbox or OneDrive - this works, to an extent, but sooner rather than later you will run into merge problems, because these cloud services are not designed to handle the intricacies of how Obsidian’s vaults operate (frequent file changes, lack of file locking, and updates to metadata files mean the risk of corruption to the data).
- Using Obsidian Git plugin - what it does, is allows you to “checkpoint” your changes via local commits and push changes to, say, Github - as often as you like. The benefit of this method is that it is far more sophisticated with handling conflicts which will occur - the drawback is, of course, that conflicts will occur and you will spend your time fixing them, rather than, you know, writing your notes.
- Using Obsidian Livesync - an ingenious plugin which more or less replicates what official Obsidian Sync does, but you have to provide your own backend to store the data (which is just an instance of CouchDB running somewhere). After trying all of the options (except official sync which wasn’t really an option for me) that’s what I ended up using.
The “official” way to get CouchDB instance they are recommending is to set up a free instance on fly.io - except it no longer appears to be free, or use IBM Cloudant - but doing so means going through a Byzantian nightmare of IBM set up process (which fully reflects their orgchart, or so it seems). Either way, you will be limited to 1GB CouchDB - this is fine if all you want is text files, but the moment you start adding attachments (like I do when writing this post), all of a sudden it becomes limiting. Therefore, our way is to set up our own CouchDB, on our very own VPS / home server.
Our very own CouchDB
Before you proceed, I encourage you to read their official guide - it’s quite good, and might just do what you need.
There’s a bunch of assumptions we make here:
- You have a VPS which is externally accessible, or you can set up port forwarding to your home server (everyone has a home server, remember?)
- You have your own domain for which you can modify DNS records.
- You are using Cloudflare for your domain management - there are other options, but that’s the one I’m focussing on here. We need this for automatic SSL certificate provisioning and verification using ACME.
Most (all?) of the process will be managed via Docker - which makes it a bit more straightforward and replicate-able.
We start with defining our .env file which will contain some important values.
# The domain (or subdomain) you want to use for your installation
SERVER_HOST=my.host.name.com

# You can change it to pretty much whatever you want.
SERVER_PORT=5984

# Username to be used with this CouchDB install
COUCHDB_USER=obsidian_couchdb_user

# Password to be used with CouchDB
COUCHDB_PASSWORD=<your-password-here>

# API token to manage domains with Cloudflare. See below how to get it.
CLOUDFLARE_API_TOKEN=<cloudflare-api-token>
To obtain the API token, go to Cloudflare dashboard, go to “My Profile,” select “API Tokens,” click “Create Token,” choose a template or configure a custom token with the necessary permissions specifically for my.host.name.com, and then save and copy the generated token.
Next file to create will docker-compose.yml
version: '3.9'
services:
  # Our database service, what we've started all of this for
  couchdb:
    image: couchdb:latest
    container_name: couchdb
    volumes:
	  # I prefer to externalise Docker volumes (use bind mount) rather
	  # than keep somewhere deep in `/var/lib/docker`
      - /home/$USER/obsidian/couchdb/data:/opt/couchdb/data
    environment:
      - COUCHDB_USER=${COUCHDB_USER}
      - COUCHDB_PASSWORD=${COUCHDB_PASSWORD}
    restart: unless-stopped
    networks:
      - couchdb_network

  # Note how `couchdb` doesn't expose any ports? That's because
  # we don't want to expose CouchDB directly to the internet
  # and instead we'll use Caddy - fast and configurable reverse
  # proxy which makes many things a lot more simple.
  caddy:
    # Instead of using caddy:latest we build our own image.
    # Why is that? Read on!
    build:
      context: .
      dockerfile: Dockerfile.caddy
    container_name: caddy
    ports:
      - "5984:5984"
    volumes:
      - /home/$USER/obsidian/caddy/data:/data
      - /home/$USER/obsidian/caddy/config:/config
      - ./Caddyfile:/etc/caddy/Caddyfile
    environment:
      - CLOUDFLARE_API_TOKEN=${CLOUDFLARE_API_TOKEN}
    restart: unless-stopped
    networks:
      - couchdb_network

networks:
  couchdb_network:
    driver: bridge
So why not using pre-built Caddy image? Problem is, by default it doesn’t have Cloudflare plugin installed (or any plugins, for that matter). Fortunately, it provides a tool called xcaddy that allows you to build Caddy with just the set of plugins you need. Here’s how we do it - cue Dockerfile.caddy:
FROM caddy:builder AS builder
RUN xcaddy build \
    --with github.com/caddy-dns/cloudflare

FROM caddy:latest
COPY --from=builder /usr/bin/caddy /usr/bin/caddy
What we do here is a classic two-stage build. First we use caddy:builder which has xcaddy in it to build Caddy binary, and then we take caddy:latest and replace the actual binary with the one we’ve just built.
The last thing we need is the actual Caddyfile aka Caddy config, which will explain Caddy what do we want from it:
# I could not find a meaningful way to externalise
# the hostname and the port here!
my.host.name.com:5984 {
    reverse_proxy couchdb:5984
    tls {
        dns cloudflare {env.CLOUDFLARE_API_TOKEN}
    }
    header {
        Access-Control-Allow-Origin "app://obsidian.md"

        Access-Control-Allow-Methods "GET, POST, PUT, DELETE, OPTIONS"
        Access-Control-Allow-Headers "Content-Type, Authorization"
        Access-Control-Allow-Credentials "true"
        Access-Control-Max-Age 86400
    }

    @cors_preflight {
        method OPTIONS
        header Origin app://obsidian.md
    }
    handle @cors_preflight {
        respond "OK" 204
    }
}
Everything here is more or less stripped down copy of the config for Traefik from the official guide.
So, let’s try to find out if it works:
# you may need to sudo ufw allow 5984
docker compose up
With some luck, CouchDB will start and Caddy will obtain a certificate; now you can access your instance! Let’s check it with curl first.
[sgzmd@RK:~]$ curl -v -H "Origin: app://obsidian.md" https://my.host.name.com:5984
*   Trying 123.456.789.000:5984...
* Connected to my.host.name.com (123.456.789.000) port 5984 (#0)
* ALPN, offering h2
* ALPN, offering http/1.1
*  CAfile: /etc/ssl/certs/ca-certificates.crt
*  CApath: /etc/ssl/certs
* TLSv1.0 (OUT), TLS header, Certificate Status (22):
* TLSv1.3 (OUT), TLS handshake, Client hello (1):
* TLSv1.2 (IN), TLS header, Certificate Status (22):
* TLSv1.3 (IN), TLS handshake, Server hello (2):
* TLSv1.2 (IN), TLS header, Finished (20):
* TLSv1.2 (IN), TLS header, Supplemental data (23):
* TLSv1.3 (IN), TLS handshake, Encrypted Extensions (8):
* TLSv1.2 (IN), TLS header, Supplemental data (23):
* TLSv1.3 (IN), TLS handshake, Certificate (11):
* TLSv1.2 (IN), TLS header, Supplemental data (23):
* TLSv1.3 (IN), TLS handshake, CERT verify (15):
* TLSv1.2 (IN), TLS header, Supplemental data (23):
* TLSv1.3 (IN), TLS handshake, Finished (20):
* TLSv1.2 (OUT), TLS header, Finished (20):
* TLSv1.3 (OUT), TLS change cipher, Change cipher spec (1):
* TLSv1.2 (OUT), TLS header, Supplemental data (23):
* TLSv1.3 (OUT), TLS handshake, Finished (20):
* SSL connection using TLSv1.3 / TLS_AES_128_GCM_SHA256
* ALPN, server accepted to use h2
* Server certificate:
*  subject: CN=my.host.name.com
*  start date: Jun 13 15:48:59 2024 GMT
*  expire date: Sep 11 15:48:58 2024 GMT
*  subjectAltName: host "my.host.name.com" matched cert's "my.host.name.com"
*  issuer: C=US; O=Let's Encrypt; CN=E5
*  SSL certificate verify ok.
* Using HTTP2, server supports multiplexing
* Connection state changed (HTTP/2 confirmed)
* Copying HTTP/2 data in stream buffer to connection buffer after upgrade: len=0
* TLSv1.2 (OUT), TLS header, Supplemental data (23):
* TLSv1.2 (OUT), TLS header, Supplemental data (23):
* TLSv1.2 (OUT), TLS header, Supplemental data (23):
* Using Stream ID: 1 (easy handle 0x5646658f6eb0)
* TLSv1.2 (OUT), TLS header, Supplemental data (23):
> GET / HTTP/2
> Host: my.host.name.com:5984
> user-agent: curl/7.81.0
> accept: */*
> origin: app://obsidian.md
>
* TLSv1.2 (IN), TLS header, Supplemental data (23):
* TLSv1.3 (IN), TLS handshake, Newsession Ticket (4):
* TLSv1.2 (IN), TLS header, Supplemental data (23):
* Connection state changed (MAX_CONCURRENT_STREAMS == 250)!
* TLSv1.2 (OUT), TLS header, Supplemental data (23):
* TLSv1.2 (IN), TLS header, Supplemental data (23):
* TLSv1.2 (IN), TLS header, Supplemental data (23):
< HTTP/2 200
< access-control-allow-credentials: true
< access-control-allow-headers: Content-Type, Authorization
< access-control-allow-methods: GET, POST, PUT, DELETE, OPTIONS
< access-control-allow-origin: app://obsidian.md
< access-control-max-age: 86400
< alt-svc: h3=":5984"; ma=2592000
< cache-control: must-revalidate
< content-type: application/json
< date: Fri, 14 Jun 2024 10:30:16 GMT
< server: Caddy
< server: CouchDB/3.3.3 (Erlang OTP/24)
< x-couch-request-id: 30e3a62bf4
< x-couchdb-body-time: 0
< content-length: 247
<
* TLSv1.2 (IN), TLS header, Supplemental data (23):
{"couchdb":"Welcome","version":"3.3.3","git_sha":"40afbcfc7","uuid":"c7ea764f0f7f274a95c48c574b2dd19b","features":["access-ready","partitioned","pluggable-storage-engines","reshard","scheduler"],"vendor":{"name":"The Apache Software Foundation"}}
* Connection #0 to host my.host.name.com left intact
If everything works as expected, you will see something similar to the output above. If not, well, it’s broken and you’ll need to read it and fix it (often pasting output to ChatGPT just about does it). Double-check by going to https://my.host.name.com:5984 in the browser and logging in with your username and password.
And now - let’s move on to the actual Obsidian configuration
Configuring Obsidian
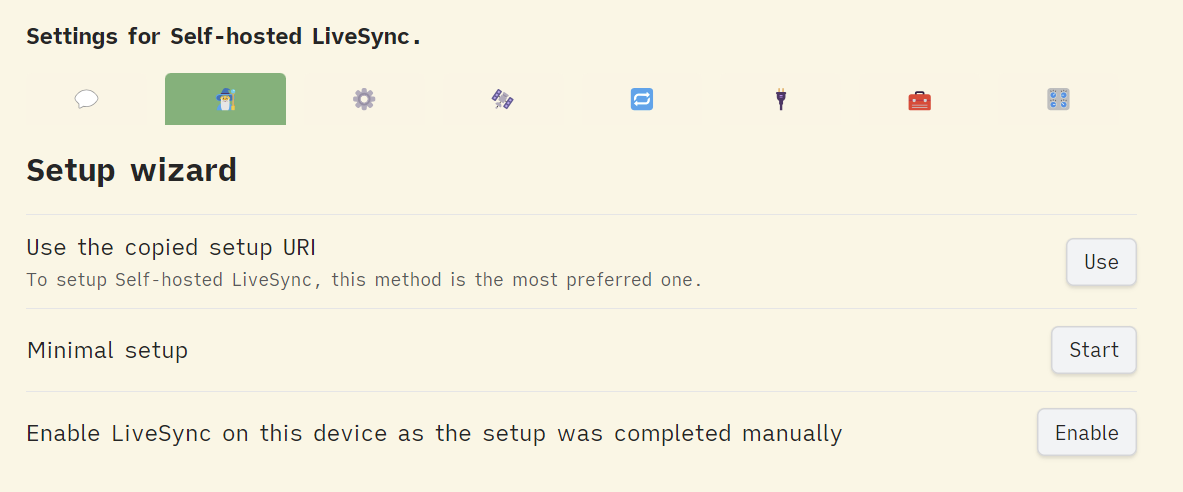
If everything was done right, the rest of it should be pretty straightforward. Install Obsidian Livesync from Community plugins, enable it and go to the settings. I recommend you to go to the 🧙♂️ Wizard page and read the content there - many problems that might occur have a solution there. After that, proceed with the “Minimal setup”:
I strongly recommend you to enable end-to-end encryption in the settings below:

In layman terms, this means that all the data which leaves your device, including file names (which may in its own contain valuable information) are encrypted. The obvious downside is that it will be nearly impossible to recover the data should you lose access to the actual files and encryption token.
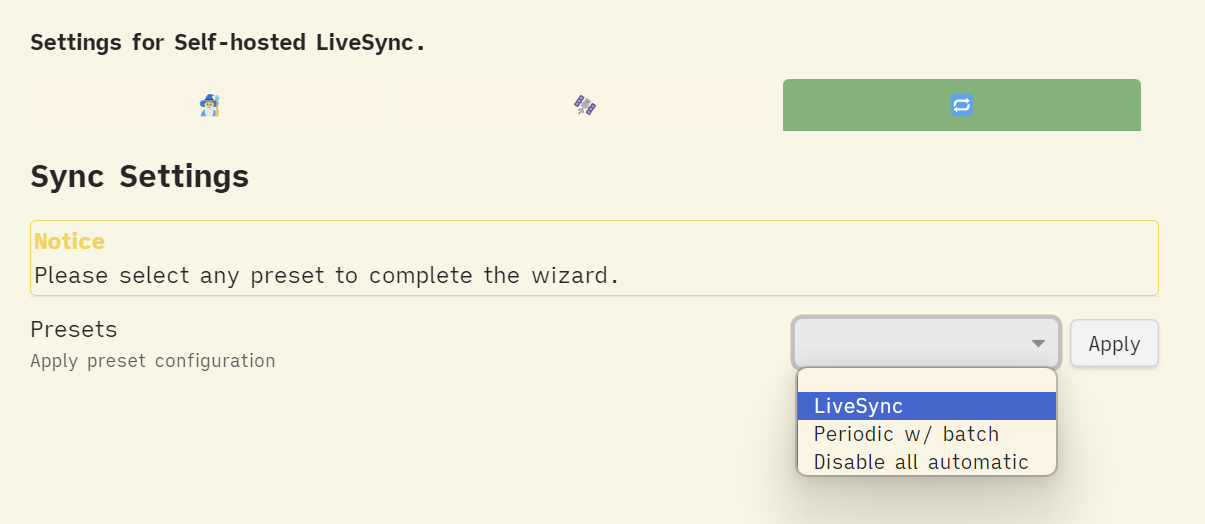
Press Next and on the next screen chose LiveSync as the sync preset: it means all changes will be applied automatically, as soon as you save the file:
Click Apply - the window will now close, and the synchronisation will start. If you’ve done everything properly, soon you will be presented with a dialogue suggesting you to copy the encrypted setup URI you can use to set the sync up on the new device. It will look like that:
obsidian://setuplivesync?settings=.....
Alternatively, if something didn’t work, you’ll be presented with an error message
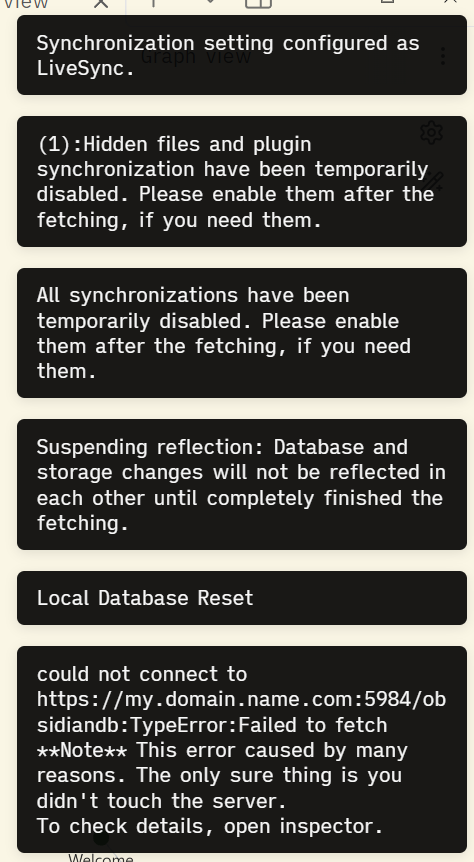
To understand just what the hell is going on, go to Developer Settings (don’t forget, Obsidian app is made with Electron, i.e. it’s essentially Chromium). Press Ctrl (or Command) + Shift + I and switch to Console tab.
In this example you will obviously see net::ERR_NAME_NOT_RESOLVED:
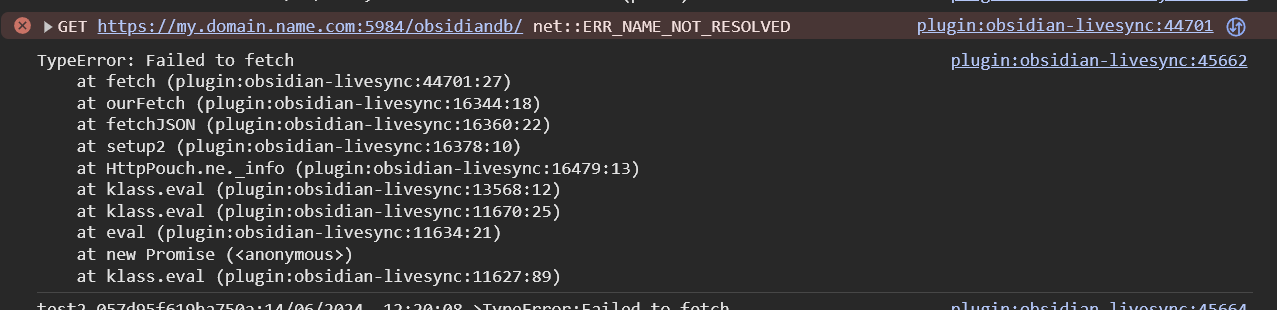
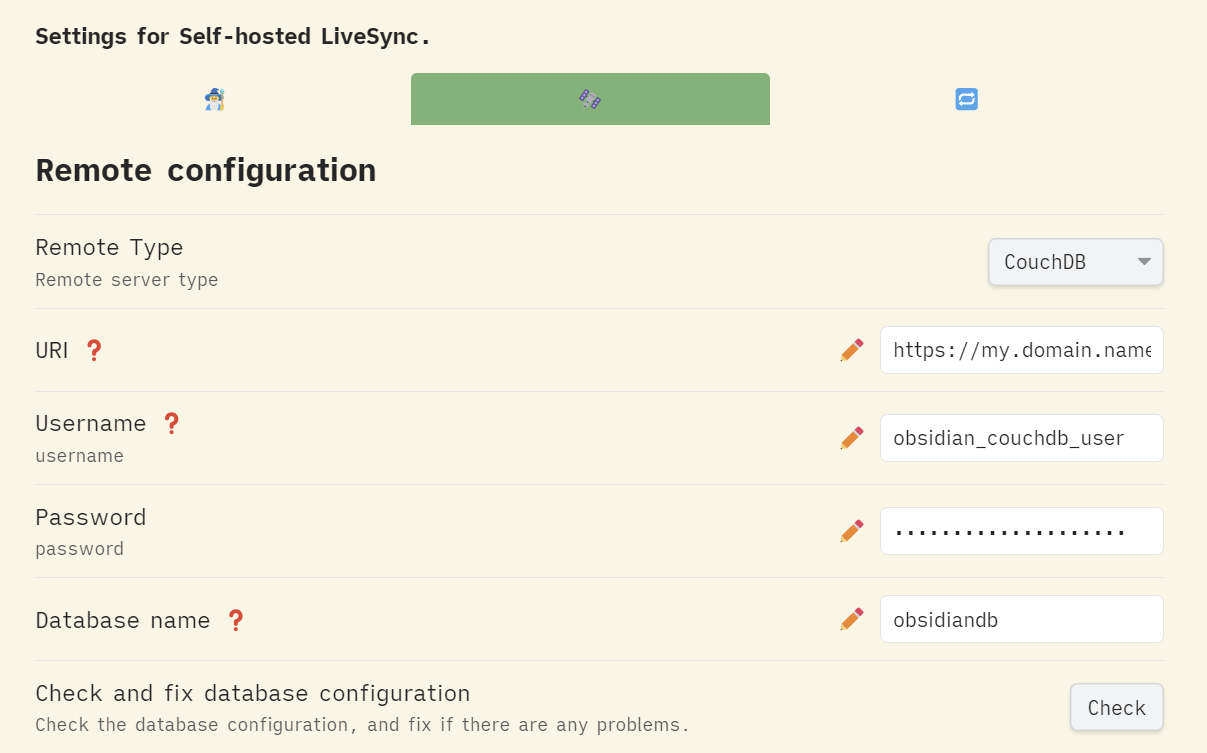
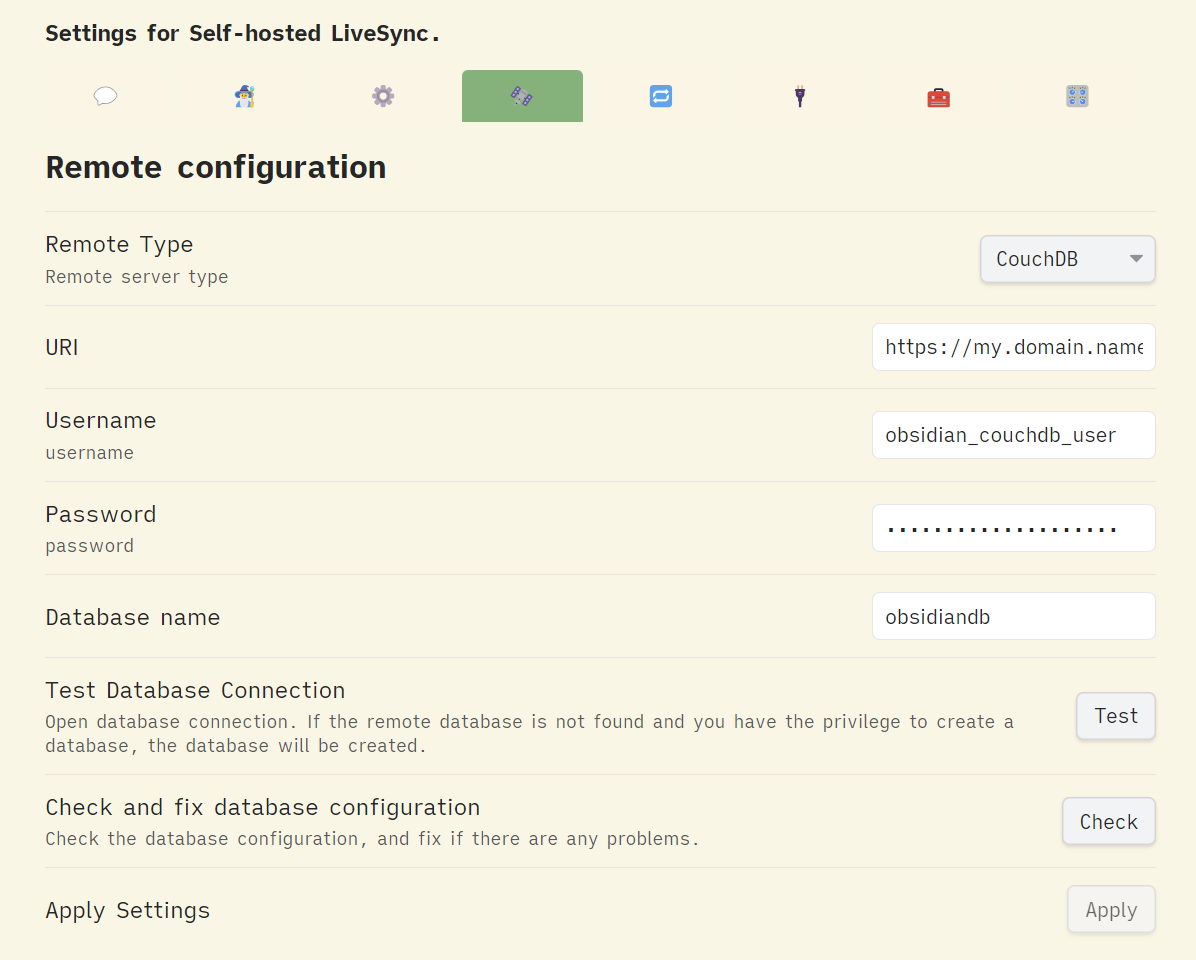
But there could be all other sorts of errors - keep an eye on them. When you fixed (or at least you think you fixed the problem) go to Livesync settings -> Configuration page and use Test button to check database connection:
Eventually, you will resolve all the problems - congratulations, now you have your very own CouchDB with your very own notes, sync’ed automatically!